
Mastering the Perfect Homemade Pierogi
Have you ever had a delicious pierogi that hit each of your taste buds just right? These attractive-looking Polish dumplings with tender morsels of dough and tasty fillings will take your taste buds to great heights. Although store-bought versions are acceptable, is it not much more fun to make them from scratch by hand? If you are a fan of these tasty Eastern European specialties, read this guide and learn more about them. Whether you’re a beginner or an expert, you will find an explanation of the steps on how to make tasty homemade pierogies near me from choosing the best ingredients to folding them correctly. Inexperienced cooks and professional chefs will jump on a delightful journey that will satiate your taste buds while impressing your dinner guests. I have 20 years of experience in cooking. So you can trust me.
A Brief History of Pierogi
Origins in Eastern Europe
Pierogi, the best-singing and well-known dumplings that have won the taste of hearts all over the world, have a great origin connected with the eastern European nations’ cuisine. These mouth-watering pastry cases containing meat vegetable or fruit fillings are a standard feature of Polish, Ukrainian, and Russian cooking. Though there is controversy as to the sources the best homemade perogies are said to have existed in Poland as early as the 13th century.
Cultural Significance and Traditions
Historically, pierogi were regarded as a peasant’s dish because they were usually made of inexpensive products and filled with miscellaneous dense foods. Yet in some time, they would become one of the favorite meals for everyone, including the upper classes. Throughout Polish culture, the best homemade pierogi recipe is especially associated with holiday meals, the Wigilia, when the meal during which they are prepared cannot contain more than twelve dishes.
Global Popularity and Variations
When the Eastern Europeans moved to other parts of the world most especially to North American countries, their traditions of preparing the pierogi recipe were also transported with them. Therefore, it served to give the particular dish more visibility and ideas for the creation of different regional branches. There are a lot of variations of perogies recipes today; you really can get potato and cheese, savory sauerkraut, or even sweet strawberries and Blueberries pierogi, buffalo chicken pierogi, or chocolate pierogi. The simplest kind of comfort food that has now made its way around the world, loaded perogies has indeed become a household name.
Key Ingredients for Making Pierogi Dough
And as with most of these dishes, the secret is in the dough. The best solution for making the dough tender as well as strong enough to withstand the stuffing you love entails the use of a few vital ingredients.

Flour Power
As for most of the dough recipes of homemade pierogies all-purpose flour is used as the main ingredient. It adds structure and helps get that all-important chewy texture going on. Another option is to use all-purpose flour and cake flour because the latter will give the meat a softer texture.
The Binding Agents
It also had eggs for the purpose of incorporating into the dough and enriching the dough as well. It also helped for helping to contribute to the elasticity of the doughs that were making it easier for one to roll out and shape. In some recipes, a whole egg is used, in other ones only yolks are used to make the dish taste richer.
Liquid Gold
Milk or warm water softens the dough and causes the gluten in the flour to swell. Temperature is an issue throughout the whole preparation; the liquid should not be too hot to kill the yeast (if used); on the other hand, it must not be too cold, or the ingredients will not blend correctly.
The Flavor Enhancers
Of course, it is, a pinch of salt in the dough is crucial – it makes the flavors stand out. For an added taste of luxury and to make the dough more tender some bakers also include a little sour cream or butter. These ingredients can take your potato pierogi from good to something else entirely.
How to Make the Perfect Pierogi Filling
Choose Your Base Wisely
Any great filling starts with the base and this can never be forgotten when making all recipes pierogies fillings. If you wish to keep it traditional, then mashed potatoes are the way to go. Make sure that is not too wet but also not very dry, it should just be creamy in consistency. You could try ricotta cheese instead, or even mashed cauliflower for those on a low-carb diet.
Add Flavor and Texture
Add some more complementary ingredients to make it more delicious when you are filling it. Adding cooked onions makes the dishes have a sweetness to them while bacon crumbs give them a nice tasty crunch. If you prefer something vegetarian, choose roasted mushrooms for the dish or caramelize the leeks instead. Do not omit spices and herbs such as salt, black pepper, and dill or chives.
Balance Moisture Content
In their preparation, there is always that balance of moisture that should be instilled in the American pierogi casserole to get it flavored to the ultimate, perfect taste. It is never appropriate if the dough of the empanada becomes too wet and wet on the inside or too dry, whereby the filling feels crumbly. If you’re using cheese, it should be stirred well into the base mixture, so that it disperses evenly. In the case of using fruits in making the filling, the fruits should be blended and cooked down slightly to remove under-cooked moisture.
Chill Before Filling
After preparing your filling it is important to leave it to cool down before using it in your recipe. In addition to this, it also makes its handling easier without allowing the dough to get too warm and sticky when assembling its components. The best outcome is achieved when your filling is chilled for at least an hour before making your authentic pierogi recipe.
Step-by-Step Guide to Assembling and Cooking Pierogi

Preparing the Workspace
Every assembly procedure has to be preceded by cleaning and tidiness of the working environment in question. Lay out all necessary tools: The ingredients in their preparation are going to include a big chopping block, a small bowl of water, a fork, and a clean piece of cloth. The field should be dusted lightly with flour for nonstick purposes after cleaning with a damp cloth.
Filling and Sealing
Using the dough take a portion and flatten it carefully into a circular shape that is slightly thick at 1/8 of an inch. In the center of the rectangle put a small spoon of filling, do not overfill the pastry. Take your finger and wet it in water then run it around the edge of the dough circle. Bring the left corner of the dough up to the right corner of the dough and fold it in the middle, making sure that you press it well. Just use a fork thereby compacting and sealing the edges well.
Cooking Methods
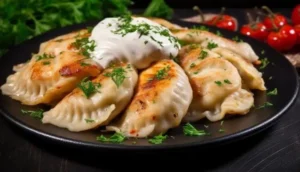
Pierogi can be boiled and then fried, essentially boiled till they are ready to be fried or baked. For boiling, just add these into salted, boiling water and boil until they rise to the top, which should take 2-3 minutes. For pan-frying use butter to fry in a skillet until it is well-browned on both surfaces. For baking coat with butter and place it in the oven at 375 degrees F for 15 – 20, minutes or until crisp.
Storing and Freezing Leftover Pierogi

Proper Storage Techniques
When you decide to take your time and prepare a homemade authentic Polish meat pierogi recipe, sometimes you’re left with some that you didn’t finish. To preserve such a taste and texture, their storage is of great importance. To reheat cooked baba’s perogies recipe, microwave for 2-3 minutes, carefully arrange on a baking sheet, and bake at 350°F for 10-15 minutes or steamed, boiling water for 3-5 minutes. For storage, after cooking the authentic Polish pierogi dough recipe cool to room temperature and transfer them to an airtight container where they can be placed in the refrigerator for 1-3 days at most. To avoid food sticking onto it, coat it with flour or if baking place a sheet of parchment paper in between layers.
Freezing for Long-Term Enjoyment
However, if you want it to be stored for several days down to several weeks, then freezing could be the best bet. Place the finely divided uncooked bacon-wrapped pierogies on a humid area, such as a floured baking sheet, so they don’t stick to each other. Remove the baked perogies chemo from the boiling water,’ she said, ‘and put the sheet in the freezer for 2- 3 hours until firm. When the cookies are thoroughly frozen, bin them up carefully in clean freezer-safe bags or containers, with little regard for air. When frozen, baked perogies can be kept for up to 3 months when put in the right freezer conditions.
Reheating Frozen Pierogi
There is something very simple to know when you are now ready to prepare your frozen pierogi; don’t defrost them! It is however advisable to drop the dumplings in boiling water and let them boil for about 3- 5 minutes until they float to the surface. Also, the frozen baked pierogi recipe can be cooked through pan frying in butter until crisp on the outside and hot in the middle. This method leads to the crusty outside layer and hot and tasty inside stuffing.
Conclusion
Just a word to any of you who wants to venture into making these beef pierogies, do not worry you are in safe hands just remember you cannot make a perfect one on the first try you have to practice. Following the instructions given in this guide will help you come up with mouth-watering and as close to Polish grandmas’ pierogis as possible. When it comes to the filling or the dough, you can experiment for as long as it is possible and create your firm’s brightly-defined touch. However, whenever you’re cooking this for a big event or planning to eat it during dinner with your family, homemade pierogis will never disappoint you. If I can share some enthusiasm you too will soon make lovely little dumplings, ]oys to bring out the fun and follow the traditions of making the most delicious foods at home. Happy cooking!
FAQs
Can I freeze homemade pierogies?
Absolutely! One thing that can be done about homemade pierogies is to freeze them to have them at another time. Once water is boiled let them simmer before removing them from boiling water. Place them in one layer onto a baking sheet and put it into the freezer until firm. After that, it is recommended to transfer this product to a freezer bag. They will keep for up to 3 months. The product can be consumed when still frozen but should be boiled from frozen for an additional few minutes before consumption.
What’s the best way to reheat pierogies?
To achieve great texture cook refrigerated pierogies in butter on a skillet until they are crispy and golden. Or you can heat them in the microwave, which is a quick way but it takes away the crispiness of the chips. If reheated from frozen the dishes should be boiled for some time and then pan-fried for the best results.
Can I make pierogies ahead of time?
Certainly! Divide the dough and filling for the pies a day in advance and let them stand in the refrigerator. Hold the pierogies in fridges once cooked and prepare when it’s time to serve them. While using uncooked pierogies, place the cooked ones on a baking sheet and freeze; they can be placed in a FREEZER BAG for freezing for up to 3 months.
About Us:
10 Best Chili Recipes to Warm Up Your Winter
An Authentic New Orleans Gumbo Recipe
Mastering the Art of Making Sambusa at Home